


'개발환경' 카테고리의 다른 글
| Mac Os 터미널에서 사용자 이름 숨기기 (0) | 2020.02.09 |
|---|---|
| zsh syntax hightlight 적용하기 (0) | 2020.02.09 |
| Mac Os에서 iterm2와 zsh 설치하기 (0) | 2020.02.09 |
| Mac Os에서 Tmux 설치 & 사용법 (0) | 2020.02.09 |
| Mac Os에서 ctags 설치 & 사용법 (0) | 2020.02.09 |

| Mac Os 터미널에서 사용자 이름 숨기기 (0) | 2020.02.09 |
|---|---|
| zsh syntax hightlight 적용하기 (0) | 2020.02.09 |
| Mac Os에서 iterm2와 zsh 설치하기 (0) | 2020.02.09 |
| Mac Os에서 Tmux 설치 & 사용법 (0) | 2020.02.09 |
| Mac Os에서 ctags 설치 & 사용법 (0) | 2020.02.09 |
vi ~/.bashrc

#아래 명령어 추가
DEFAULT_USER="$(whoami)"

#저장후
source ~/.bashrc
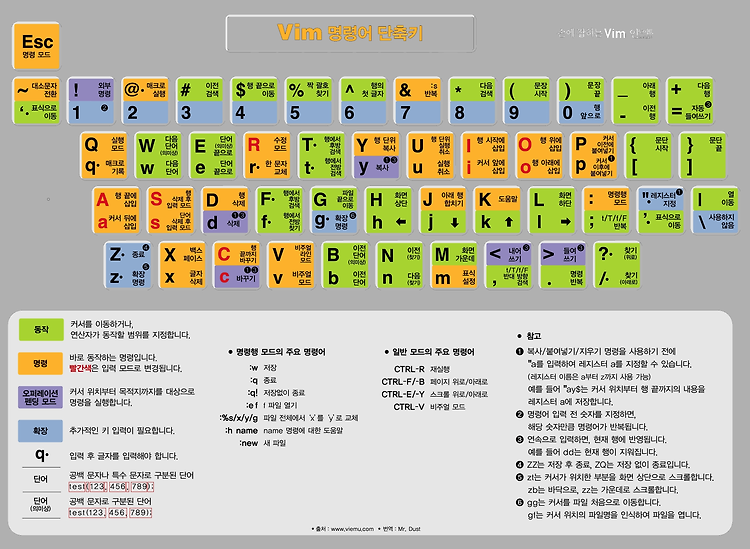
| VIM 단축키 (0) | 2020.02.09 |
|---|---|
| zsh syntax hightlight 적용하기 (0) | 2020.02.09 |
| Mac Os에서 iterm2와 zsh 설치하기 (0) | 2020.02.09 |
| Mac Os에서 Tmux 설치 & 사용법 (0) | 2020.02.09 |
| Mac Os에서 ctags 설치 & 사용법 (0) | 2020.02.09 |

zsh syntax hightlight를 설치하면 명령어가 초록색으로 변하는데 사용할 수 없는 명령어는 빨간색으로 표시해 줍니다.
설치방법은 간단합니다.
//brew를 통해 설치해줍니다.
brew install zsh-syntax-highlighting

//플러그인을 적용합니다.
source /usr/local/share/zsh-syntax-highlighting/zsh-syntax-highlighting.zsh| VIM 단축키 (0) | 2020.02.09 |
|---|---|
| Mac Os 터미널에서 사용자 이름 숨기기 (0) | 2020.02.09 |
| Mac Os에서 iterm2와 zsh 설치하기 (0) | 2020.02.09 |
| Mac Os에서 Tmux 설치 & 사용법 (0) | 2020.02.09 |
| Mac Os에서 ctags 설치 & 사용법 (0) | 2020.02.09 |
기본적으로 terminal과 bash가 설치되어 있지만 iterm2와 zsh에서 좀 더 많은 기능을 제공하기 때문에 개발을 좀 더 편하게 하기 위해 설치하기로 했습니다.
brew install iterm2
brew install zsh

#oh_my_zsh 설치
sh -c "$(curl -fsSL https://raw.github.com/robbyrussell/oh-my-zsh/master/tools/install.sh)"

#기본쉘 변경하기
echo $SHELL
chsh -s `which zsh`

#기존의 ~/.bashrc에 추가한 내용이 있다면 ~/.zshrc에도 적어주도록 합니다.
추가로 현재 디렉토리에서 Git의 상태를 알려주는 agnoster테마로 변경시켜 줍니다.
vi ~/.zshrc

#zsh테마 항목을 "robyrussell"에서 "agnoster"로 변경시켜 줍니다.
ZSH_THEME=”agnoster”
변경후 폰트가 깨지게 되는데 iterm의 폰트를 https://github.com/naver/d2codingfont에서 받은 폰트로 변경시키면 해결됩니다.
| Mac Os 터미널에서 사용자 이름 숨기기 (0) | 2020.02.09 |
|---|---|
| zsh syntax hightlight 적용하기 (0) | 2020.02.09 |
| Mac Os에서 Tmux 설치 & 사용법 (0) | 2020.02.09 |
| Mac Os에서 ctags 설치 & 사용법 (0) | 2020.02.09 |
| .vimrc 파일 저장(수정중) (0) | 2020.02.09 |
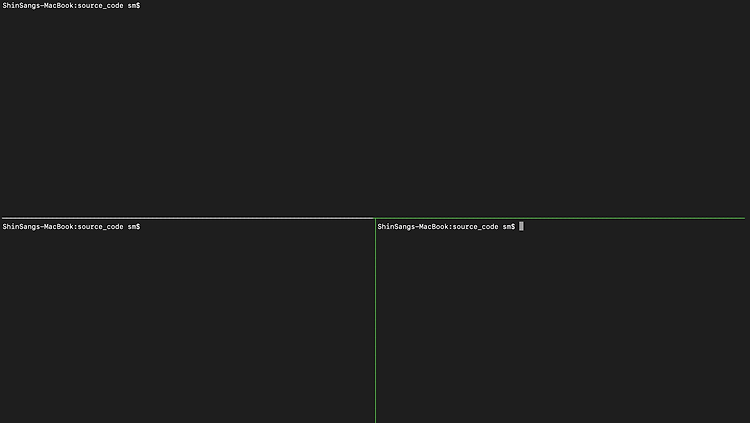
Tmux는 하나의 터미널 화면에서 여러개의 화면을 분할해 사용할 수 있게 해줍니다. 매번 새로운 터미널을 띄울필요 없이 작업할 수 있게 해줍니다.
brew install tmux
#새로운 session 생성
tmux new -s <session_name> -n <window_name>

#session 이름 수정
ctrl + b, $

#session 종료는 tmux에서 exit

#session 중단하기
ctrl + b, d

#session 목록 보기
tmux ls

#session 다시 시작
tmux attach -t <session-number or session-name>

#페이지 이동
alt + up, down
#window 생성
ctrl + b, c
#window 이름 수정
ctrl + b, ,
#window 종료
ctrl + d
#window 이동
ctrl + b, 0-9 : window number
n : next
p : prev
w : window selector#pane 나누기
ctrl + b, % : 세로 분할
" : 가로 분할
#pane 이동
ctrl + b, q : number
o : 순서대로 이동
#pane 닫기
ctrl + d
#사이즈 조절
ctrl + b, :resize-pane -L,R,D,U 10
OR
ctrl + b, alt + 방향키
#레이아웃 변경
ctrl + b, spacebar
set -g mouse on 						#마우스 사용
set-option -g history-limit 10000		#history 라인 10000
set-option -g default-shell /bin/zsh	#기본 bash zsh로 변경
참고
| zsh syntax hightlight 적용하기 (0) | 2020.02.09 |
|---|---|
| Mac Os에서 iterm2와 zsh 설치하기 (0) | 2020.02.09 |
| Mac Os에서 ctags 설치 & 사용법 (0) | 2020.02.09 |
| .vimrc 파일 저장(수정중) (0) | 2020.02.09 |
| MacOs10.14에서 neovim과 coc.nvim으로 python 개발환경 만들기 (1) | 2020.02.09 |
Ctags란 소스 파일에서 찾은 이름의 태그파일을 생성하는 도구입니다. 함수, 변수, 클래스 등을 인덱싱 하는데 사용할 수 있습니다. Ctags를 사용하면 vim과 같은 텍스트 편집기로 해당 함수를 빠르게 찾고 이동할 수 있습니다.
brew install ctagsbrew를 이용해 ctags를 설치해 주도록 합니다.
#현재 디렉토리와 하위 디렉토리의 모든 파일을 대상으로 tags 생성
ctags -R *
명령어 실행후 폴더에 tags파일이 생성된 것을 확인할 수 있습니다.
이제 vim으로 분석하고자 소스코드를 열어서 분석하고자 하는 함수위에 커서를 올려두고 'Ctrl + ]'를 누르면 함수로 이동하게 됩니다. 다시 원래있던 곳으로 돌아오기 위해선 'Ctrl + t'를 누르면 됩니다.
현재 ~/.config/nvim/init.vim파일에 Ctrl+] 를 F12로 매칭해서 사용되게 해놨습니다.
vi ~/.config/nvim/init.vim

#다음을 추가
" goto definition with F12
map <F12> <C-]>
| Tag Command | 설명 |
| Ctrl+] | 함수가 정의된 위치로 이동, |
| Ctrl+t | 이동하기 전 단계의 위치로 이동 |
| :stj Or :sts | 함수가 정의된 위치로 창을 수평 분할하여 이동 |
| :tn | 여러개의 함수 이름이 존재할 때 다음 함수로 점프 |
| :tp | 여러개의 함수 이름이 존재할 때 이전 함수로 점프 |
| :tr | 가장 처음에 찾았던 함수를 선택한다. |
| :tl | 가장 마지막 함수를 선택한다. |
참고
| Mac Os에서 iterm2와 zsh 설치하기 (0) | 2020.02.09 |
|---|---|
| Mac Os에서 Tmux 설치 & 사용법 (0) | 2020.02.09 |
| .vimrc 파일 저장(수정중) (0) | 2020.02.09 |
| MacOs10.14에서 neovim과 coc.nvim으로 python 개발환경 만들기 (1) | 2020.02.09 |
| Homebrew의 bundle로 Mac한번에 셋팅하기 (0) | 2019.11.11 |
"----------------------------------------------------------------------------------
"-- config
"----------------------------------------------------------------------------------
" set UTF-8 encoding
set enc=utf-8
set fenc=utf-8
set termencoding=utf-8

set hlsearch                    "highlight searching result
set ignorecase                  "ignore Case sensitive when searching
set history=1000                "store :cmd history
set relativenumber              "show relative number from current line
set cursorline                  "highlight cursor line
set mouse=h                     "Enable mouse in help mode
set wrap

syntax sync minlines=200        "For speed up vim
set clipboard=unnamed           "yank, paste to system clipboard


set nocompatible                " disable vi compatibility (emulation of old bugs)
set autoindent                  " use indentation of previous line
set smartindent                 " use intelligent indentation for C

" configure tabwidth and insert spaces instead of tabs
set tabstop=4                   " tab width is 4 spaces
set shiftwidth=4                " indent also with 4 spaces
set expandtab                   " expand tabs to spaces

" wrap lines at 120 chars. 80 is somewaht antiquated with nowadays displays.
set textwidth=120

" colorscheme wombat256
set t_Co=256

" turn syntax highlighting on
syntax on

set number                      " turn line numbers on
set showmatch                   " highlight matching braces

set comments=sl:/*,mb:\ *,elx:\ */      " intelligent comments

"----------------------------------------------------------------------------------
"-- keyboard mappings
"----------------------------------------------------------------------------------
" Keep undo history across sessions, by storing in file.
silent !mkdir ~/.config/nvim/backups > /dev/null 2>&1
set undodir=~/.config/nvim/backups
set undofile


"----------------------------------------------------------------------------------
"-- keyboard mappings
"----------------------------------------------------------------------------------
" switch between header/source with F4
map <F4> :e %:p:s,.h$,.X123X,:s,.cpp$,.h,:s,.X123X$,.cpp,<CR>
" goto definition with F12
map <F12> <C-]>


"----------------------------------------------------------------------------------
"-- plugins
"----------------------------------------------------------------------------------
call plug#begin('~/.config/nvim/plugged')
" Use release branch
Plug 'neoclide/coc.nvim', {'branch': 'release'}
" Or latest tag
Plug 'neoclide/coc.nvim', {'tag': '*', 'branch': 'release'}
" Or build from source code by use yarn: https://yarnpkg.com
Plug 'neoclide/coc.nvim', {'do': 'yarn install --frozen-lockfile'}
Plug 'nightsense/simplifysimplify'
Plug 'wakatime/vim-wakatime'            "check coding time
Plug 'scrooloose/nerdtree'
Plug 'jistr/vim-nerdtree-tabs'          "Toggle nerd tree with one key
Plug 'mattn/emmet-vim'                  "Trigger: <C-y><leader>
Plug 'jiangmiao/auto-pairs'             "Auto pair for ',), }, ]...
Plug 'airblade/vim-gitgutter'           "Show git status in vim
Plug 'ctrlpvim/ctrlp.vim'               "Ctrl + P for search file
Plug 'mhinz/vim-startify'               "fancy start page for empty vim
Plug 'iCyMind/NeoSolarized'

call plug#end()


"----------------------------------------------------------------------------------
"-- plugin config
"----------------------------------------------------------------------------------
" ----- NeoSolarized -----
"colorscheme NeoSolarized
"
set background=dark

"----- Nerd Tree -----
map nt <ESC>:NERDTreeToggle<CR>
"map nt <ESC>:NERDTree<CR>
일단 이렇게 쓰다가 추후 나에게 맞게 수정할 예정입니다.
https://seulcode.tistory.com/272 에서 많은 도움을 받았습니다.
My neovim settings: 나의 neovim 세팅을 공유합니다.
내가 vim 을 선호하는 가장 큰 이유 중 하나는 속도 이다. (간지라고는 말 못하니깐…) 그런데 최근 vim에 무분별하게 설치한 플러그인(…)때문에 속도가 조금 저하되는 문제가 발생하여 이것 저것 플러그인을 지..
seulcode.tistory.com
| Mac Os에서 Tmux 설치 & 사용법 (0) | 2020.02.09 |
|---|---|
| Mac Os에서 ctags 설치 & 사용법 (0) | 2020.02.09 |
| MacOs10.14에서 neovim과 coc.nvim으로 python 개발환경 만들기 (1) | 2020.02.09 |
| Homebrew의 bundle로 Mac한번에 셋팅하기 (0) | 2019.11.11 |
| Homebrew Cask 설치하기 (0) | 2019.11.11 |
기존 리눅스 개발환경에서는 ctags와 vi만을 사용했었습니단 이번에 파이썬을 공부하면서 더 나은(?) 개발환경을 구축해야겠다고 생각했습니다.
원래 계획은 vim을 사용해서 개발환경을 구축할 계획이었지만 자료를 찾아보던중 vim보다는 neovim을 이용해 개발환경을 구축하는 것이 더 나을 것이라 생각이들었습니다.
neovim을 선택한 이유는 vim은 python 없이 vim을 컴파일 했을 경우 python을 사용하기 위해 다시 재컴파일 해야한다는 단점이 있었지만 neovim은 pip3 install neovim 처럼 불리된 형태로 설치할 수 있었기 때문입니다.(기존의 vim도 git에서 소스를 받아 python3옵션을 추가해 컴파일하면 python3를 사용가능합니다.)
또한 neovim은 버퍼로 터미널을 쓸수도 있다. [ :bel sp 50 | resize 10 | terminal ]
brew install nvim
brew install cmake
brew install luarocks
brew install pkg-config

#nodeJs 설치
brew install node

#yarn 설치
brew install yarn

#vim-plug설치
curl -fLo ~/.local/share/nvim/site/autoload/plug.vim --create-dirs https://raw.githubusercontent.com/junegunn/vim-plug/master/plug.vim

pip3 install --user pynvim환경파일 작성
mkdir -p ~/.config/nvim
cat > ~/.config/nvim/init.vim
"----------------------------------------------------------------------------------
"-- config
"----------------------------------------------------------------------------------
" set UTF-8 encoding
set enc=utf-8
set fenc=utf-8
set termencoding=utf-8

set hlsearch
set ignorecase

set nocompatible        " disable vi compatibility (emulation of old bugs)
set autoindent  " use indentation of previous line
set smartindent " use intelligent indentation for C

" configure tabwidth and insert spaces instead of tabs
set tabstop=4        " tab width is 4 spaces
set shiftwidth=4     " indent also with 4 spaces
set expandtab        " expand tabs to spaces
" wrap lines at 120 chars. 80 is somewaht antiquated with nowadays displays.
set textwidth=120
" turn syntax highlighting on
set t_Co=256
syntax on
" colorscheme wombat256
set number      " turn line numbers on
set showmatch   " highlight matching braces

set comments=sl:/*,mb:\ *,elx:\ */      " intelligent comments


"----------------------------------------------------------------------------------
"-- keyboard mappings
"----------------------------------------------------------------------------------
" switch between header/source with F4
map <F4> :e %:p:s,.h$,.X123X,:s,.cpp$,.h,:s,.X123X$,.cpp,<CR>
" goto definition with F12
map <F12> <C-]>


"----------------------------------------------------------------------------------
"-- plugins
"----------------------------------------------------------------------------------
call plug#begin('~/.config/nvim/plugged')
" Use release branch
Plug 'neoclide/coc.nvim', {'branch': 'release'}
" Or latest tag
Plug 'neoclide/coc.nvim', {'tag': '*', 'branch': 'release'}
" Or build from source code by use yarn: https://yarnpkg.com
Plug 'neoclide/coc.nvim', {'do': 'yarn install --frozen-lockfile'}
call plug#end()


"----------------------------------------------------------------------------------
"-- plugin config
"----------------------------------------------------------------------------------
설정파일 생성 후 플러그인 설치
nvim +PlugInstall
설치가 끝나면 이제 coc환경설정 파일을 만들어 주어야합니다.
#~/.config/nvim/coc-settings.json이 열립니다
nvim +CocConfig
{
"languageserver": {
"golang": {
"command": "gopls",
"rootPatterns": ["go.mod", ".vim/", ".git/", ".hg/"],
"filetypes": ["go"]
},
"ccls": {
"command": "ccls",
"filetypes": ["c", "cpp", "objc", "objcpp"],
"rootPatterns": [".ccls", "compile_commands.json", ".vim/", ".git/", ".hg/"],
"initializationOptions": {
"cache": {
"directory": "/tmp/ccls"
}
}
},
"python": {
"command": "python",
"args": [
"-mpyls",
"-vv",
"--log-file",
"/tmp/lsp_python.log"
],
"trace.server": "verbose",
"filetypes": [
"python"
],
"settings": {
"pyls": {
"enable": true,
"trace": {
"server": "verbose"
},
"commandPath": "",
"configurationSources": [
"pycodestyle"
],
"plugins": {
"jedi_completion": {
"enabled": true
},
"jedi_hover": {
"enabled": true
},
"jedi_references": {
"enabled": true
},
"jedi_signature_help": {
"enabled": true
},
"jedi_symbols": {
"enabled": true,
"all_scopes": true
},
"mccabe": {
"enabled": true,
"threshold": 15
},
"preload": {
"enabled": true
},
"pycodestyle": {
"enabled": true
},
"pydocstyle": {
"enabled": false,
"match": "(?!test_).*\\.py",
"matchDir": "[^\\.].*"
},
"pyflakes": {
"enabled": true
},
"rope_completion": {
"enabled": true
},
"yapf": {
"enabled": true
}
}
}
}
}
}
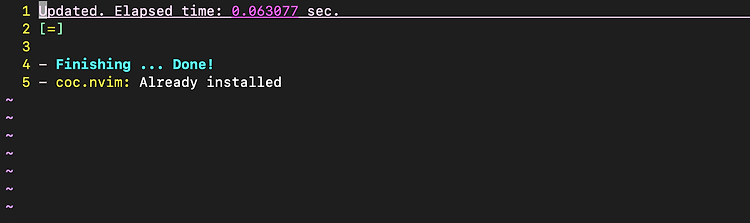
}설정파일 저장후 nvim에서 :CocInstall coc-python 입력하면 설치가 완료된다.
참고
| Mac Os에서 ctags 설치 & 사용법 (0) | 2020.02.09 |
|---|---|
| .vimrc 파일 저장(수정중) (0) | 2020.02.09 |
| Homebrew의 bundle로 Mac한번에 셋팅하기 (0) | 2019.11.11 |
| Homebrew Cask 설치하기 (0) | 2019.11.11 |
| MacOS에서 Homebrew 설치하기 (0) | 2019.11.10 |